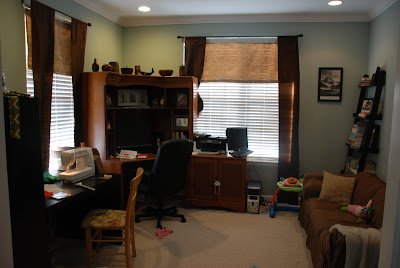
So horrible! Ugh, looking at this picture makes my stomach hurt.
The mess! The clutter! The horrific curtains!!
This next one may hurt your eyes. This window treatment was meant to be a very temporary treatment, but it stayed up for years!!
AFTER....
So it may not be worthy of a design magazine, but it's much better right? Right??
Well, for $7 worth of fabric for the entire room, I would say it's an improvement!
How cute is Penelope in the corner? She loves to sit with a book, she was going through my high school yearbook while I was taking pictures. And sweet Sky, he loves to sit in the sun. Any little pocket of sunshine he can find in the house, he is all over it.
Next time we are near an IKEA, I want to get a black shelf in here, like these, to replace the beach photo (which we got at a garage sale for $5). We are running out of room in our house for Penelope photos, so its time to create some more space.
Ok, so here is what I did:
I bought a yard and quarter of remnant fabric that was additionally marked down another 50%.
Isn't it gorgeous? I am not sure what the material is, but it had something in it that made it feel very silky. It was really nice to sew with.
I loved that it had brown and blue to match the color of the walls, furniture and the brown slip covered couch we have in there. The purple and the green were just enough color for me to really brighten up the room.
To make the curtains, I measured my window frame and then cut up the old brown panels to fit.
Then I used the fabric to make a sort of bias tape trim on the bottom. You can find out what bias tape and how to use it here.
I couldn't figure out how to sew the trim on without a thread line coming through on the front, since I didn't have enough fabric to wrap it around the edge and just sew one line to keep front and back in place like you normally do for bias tape.
SO... I just sewed the front and hot glued the back. A little ghetto, I know. But a Mama's gotta do, what a Mama's gotta do, if she wants to get things done during nap time!
Next, I made some pillows. So easy to make pillows. You just cut your fabric to the size of your pillow. If you have a 15x15 pillow, cut your fabric 15x15, this way your pillow insert will fit nice and snug.
After you cut our your squares, lay the fabric right side facing. Then sew around the edges, but leave a small hole for an opening. You can trim the corners before turning it inside out to make your corners nice and pointy. Then turn it inside out, insert your pillow and hand sew the closing shut.
Then I recovered the chair. Also, very easy. You turn the chair upside down and unscrew the cushion away from the chair. Then you use a staple gun and staple the fabric to the chair. If you watch HGTV at all, you know what I am talking about! Then screw the cushion back to the chair and viola!
So what do you think of my $7 room makeover?!


It looks great! Gotta love a cheap & easy fix!
ReplyDeleteReally your room is looking superb after this makeover. The curtains are really wonderful and all things are neat and clean. I like your work. Everything in the room is looking nice.
ReplyDelete