Thursday, April 28, 2011

Backyard Swing Set Makeover

My husband and I tag-teamed to turn this hunk of junk that was about to be taken to the dump....


Into to backyard heaven, also known as Penelope's Park, to her wee friends.


On a evening walk a few weeks ago, we spied our neighbors putting together a brand new swing set for their kids.  We noticed the old one in a heap in the corner.  And me, being me, I marched my ass up and said "Whatcha gonna do with the old set?"

When he said take it to the dump, I about fell over.  Sure, it needed some love, but it was not ready for the dump!! I restrained myself from asking if he had ever heard of Craig's List or Freecycle and instead politely said, "well, we will take it off your hands if that is ok with you!"  He said, "sure, it saves me a trip to the dump!"

So our other neighbors, who have a trailer, helped Peter haul it to our house.  Peter had to replace some of the boards on the bottom because they had rotted out. And he replaced the big kid swings with baby swings.

Then I came in for the beautification part!  First, I did a good cleaning and that made a huge difference in itself, its amazing what a little elbow grease will get you!

Then I replaced the canvas canopy with a new pretty fabric.  I bought our fabric at Joann's, on the second store visit attempt.

Our first attempt, Penelope had her first, full-on, public meltdown, as we were waiting in line to get the fabric cut, so I just picked her up, left my fabric and the cart and left. 

I went back a couple of days later to try again, and to my surprise the fabric was now 50% off!! Penelope was looking out for her Mama!!

Since I am not really good with measurements or math in general, or cutting straight lines for that matter, I used the old canvas as a pattern.


When I hemmed the edges, I didn't fold over twice, I just cut with pinking sheers.  This outdoor fabric was kind of thick, and my good 'ole, circa 2000, Kenmore sewing machine, is kind of on its last legs (which I am secretly praying for it's demise so I can get a new Bernina one), so I was afraid my machine couldn't handle going through that many layers.

I am also lazy.


Then I hung her up.  Ahh, so much better!


I had to cut little slits for the screws to go through, and I reused the old screws.  Using the old canvas as a pattern, made the new one fit like a charm.

Penelope was not to be left out of the design.  She added a few, last minute, finishing touches.  Love her.

So all in all, it cost $15 in wood, $40 in swings, and $30 of fabric, but brand new, this set would have cost at least $600. 

Seeing Penelope's face when she is swinging...priceless!

Next up, I may try to make a doll house for the bottom, like this.

Wednesday, April 27, 2011

Child Yoga: Donkey!


Donkey is the next stage of advancement after your child has learned Down Dog and later mastered. It's such a fun yoga pose for your child.  The pride they feel when they can accomplish it, is priceless.

So just like any other pose, you show them the pose first and then ask them to do it.

For Donkey, you show them Down Dog first and then say "lift your leg for Donkey!"
You can say; "What does the Donkey say?  He says Hee Haw!

This is the child version of one legged Down Dog, but when you show them, lift your leg slightly and keep it somewhat bent.  They are not going to be able to do a perfect one legged Down Dog, so show them the version of the pose that is attainable to them.

And remember, however your child express this pose or any other pose, is absolutely perfect. They are perfect, their little bodies are perfect, their individual gross motor skills development is perfect just as it is.
As long as you are breathing, you are doing yoga!
Just FYI, most of the baby yoga poses I post, I learned at my Itsy Bitsy Yoga training. The founder and creator, Helen Garabedian, has a great book and dvds that you can purchase to help your home practice. Or you can go to her website and try and find a class near you!


Tuesday, April 26, 2011

Unconditional Parenting Chapter 9 and 10

Wow, this was the longest online book club of your life, right?

This book was so fundamentally important and changed the game up big time for me, that I really felt it was important to dive into each chapter...however next book we review will probably be more general and done in one post.

So Chapter 9, Choices for Children, was yet another important chapter. It was all about giving kids choices, and not just ok, you can pick x,y, or z for dinner (although for young toddlers that is about all the choices they can handle) but really giving them an opportunity to be heard. To know that their opinions and concerns MATER. That the family is a democracy...and like a true democracy, some things are not up for a vote.

The biggest thing that stood out to me on this chapter was when he said: "The way kids learn to make good decisions is by making decisions, not by following directions."

Chapter 10, The Child's Perspective, is all about raising kids so they have good morals. So that they want to do the right thing, because its the right thing to do, not for fear of a punishment or hopes of a reward.

One of my favorite things from this chapter was in the very last paragraph: "No matter how old your children are, it's not too late to have a positive impact from this point forward."

Anytime is a good time to turn things around and be a better parent. This really hit home to me, since I had and have a horrible mother and even my husband's mother has some serious room for improvement. So I think this is true not only for us, but for our parents. You never stop needing your parents. And even if you have been a bad parent for 30 years, so you can still turn it around, if you have the courage to own up to your mistakes and make changes.


Overall, I can't say enough about this book. Whether you are pregnant or have 30 year old, if you are parent, you need to read this book!!

Friday, April 22, 2011

This Moment: Coming Up Roses!


My knock out roses have been hard at work this month.  They just recently finished their beautiful show.  But I love my back yard, when one plant is finished is onto the next one.  Their is always something beuatiful going off.  My Conferdate Jasimne is at its peak right now.

So on this Earth Day, I am trying to stop and give thanks for the amazing the bounty of the Earth.


We have about 7 bushes that are about 5 feet tall.  When we planted them a few years ago, they were so tiny, but they have done so well in their sunny spot.  I can see them straight out my kitchen window and its wonderful.


And oh, my sweet little Penelope is very into flowers these days too.  She loves to rip them off the plant and give them to me or her Papa.  We are working on "looking with our eyes" or "smelling" or "touching gently". 

Happy Earth Day to you!  And Happy early Easter!

Thursday, April 21, 2011

$7 Room Makeover

BEFORE....

So horrible!  Ugh, looking at this picture makes my stomach hurt. 

The mess! The clutter! The horrific curtains!!

This next one may hurt your eyes.  This window treatment was meant to be a very temporary treatment, but it stayed up for years!! 


AFTER....


So it may not be worthy of a design magazine, but it's much better right? Right??

Well, for $7 worth of fabric for the entire room, I would say it's an improvement!


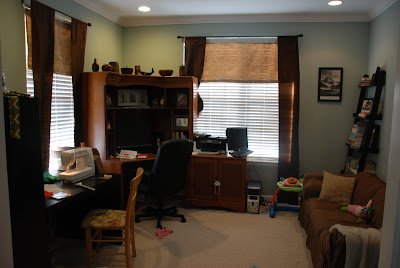
How cute is Penelope in the corner?  She loves to sit with a book, she was going through my high school yearbook while I was taking pictures.  And sweet Sky, he loves to sit in the sun.  Any little pocket of sunshine he can find in the house, he is all over it.

Next time we are near an IKEA, I want to get a black shelf in here, like these, to replace the beach photo (which we got at a garage sale for $5).  We are running out of room in our house for Penelope photos, so its time to create some more space.


Ok, so here is what I did:


I bought a yard and quarter of remnant fabric that was additionally marked down another 50%. 

Isn't it gorgeous?  I am not sure what the material is, but it had something in it that made it feel very silky.  It was really nice to sew with.


I loved that it had brown and blue to match the color of the walls, furniture and the brown slip covered couch we have in there.  The purple and the green were just enough color for me to really brighten up the room.


To make the curtains, I measured my window frame and then cut up the old brown panels to fit.


Then I used the fabric to make a sort of bias tape trim on the bottom.  You can find out what bias tape and how to use it here.
I couldn't figure out how to sew the trim on without a thread line coming through on the front, since I didn't have enough fabric to wrap it around the edge and just sew one line to keep front and back in place like you normally do for bias tape.

SO... I just sewed the front and hot glued the back.  A little ghetto, I know. But a Mama's gotta do, what a Mama's gotta do, if she wants to get things done during nap time!

Next, I made some pillows.  So easy to make pillows.  You just cut your fabric to the size of your pillow.  If you have a 15x15 pillow, cut your fabric 15x15, this way your pillow insert will fit nice and snug.


After you cut our your squares, lay the fabric right side facing.  Then sew around the edges, but leave a small hole for an opening.  You can trim the corners before turning it inside out to make your corners nice and pointy.  Then turn it inside out, insert your pillow and hand sew the closing shut.  

Then I recovered the chair.  Also, very easy.  You turn the chair upside down and unscrew the cushion away from the chair. Then you use a staple gun and staple the fabric to the chair.  If you watch HGTV at all, you know what I am talking about!  Then screw the cushion back to the chair and viola!


So what do you think of my $7 room makeover?!

Monday, April 18, 2011

Sprout Tutorial and Giveaway!!

Sprouting is one the simplest things you can do to add fresh, raw, nutrient dense greens into your diet.

BUT, do not sprout Alfalfa!  Which of course is the main seed that all sprouting kits come with.  Apparently, Alfalfa sprouts are mildly toxic and inhibit the immune system. 


I mostly sprout lentils but I also like to sprout fenugreek.  I have found that if I eat fenugreek sprouts I get in a boost in milk supply, much more of a boost than if I take fenugreek in a pill form.

I eat the sprouts as a little side to my meal, I like to eat crunchy things with my meals like bread and crackers, because I don't really like soft things in my mouth (I know that sounds dirty but I am serious!) so if I have sprouts with my meal, I tend to eat less bread or crackers with whatever I am eating.

So all you need to do, to have fresh sprouts (after you enter our giveaway!) is to soak the seeds in about two inches of water in a large class jar overnight.

Then rinse them out twice a day.  After I rinse mine, I lean my jar upside down on the counter to make sure all the liquid gets out, so mold doesn't start to form.  And wait for the magic!  You can eat them whenever you want.  Some people like longer sprouts, and others like them just as they have sprouted with no tail.


Posted by Picasa

Here some lentils two days in.


And these are four days in.

So do you want add sprouts to your diet?
Then you will want the awesome Sprout Garden Kit! Here is how to enter:

MANDATORY ENTRY: Any new comment, on any post!

I will pick our favorite comment, whether it is witty and funny, or sweet and thoughtful, controversial or introspective, whatever strikes us as particularly awesome.

Good luck everyone! Giveaway will run until 5.11.11! I will use random generator to pick a winner and will email the winner and announce it here on the blog. The winner will have 48 hours to respond or a new winner will be announced.


DISCLAIMER: I was not paid for this post. If you are interested in having me do a review and giveaway for your business or product, or about our advertising pricing, send me an email at mamaandbabylove at gmail dot com.

Thursday, April 14, 2011

Natural Easter Egg Coloring


While the food dye industry continues to assert that food dye's have no correlation of hyperactivity in children and whole host of other negative impacts, I for one, do not believe them at all.  Just a few weeks ago the Huffington Post came out with an article about how the FDA is looking into changing their official statement on food dyes. If they do, it will be the first thing the FDA has done right in awhile.

In the meantime, lets just go with our guts.  Food dye can't be good, can it? How can anyone think  ingesting something that is bright orange or bright red is OK?  You couldn't pay me a million dollars to give Penelope Gatorade, or jello, or goldfish or store bought Popsicles. 

So I sure as shit wasn't going to dye our Easter Eggs with Red 40.  No ma'am!

I bought three bottles of natural food dye from our local organic grocery store.  They are all created naturally, for example the yellow was made from Turmeric.  Which you can do on your own (click on this link! it takes you to the cutest foodie blog), but I got too busy to make food dye from scratch.


Instead of hard boiling the eggs, I blew out the egg yolks.  I have a farmer deliver eggs to my house every other week, for myself and some of my friends.  I had a few extra dozen one week and I didn't want them to go to waste. So I thought, perfect, will use them for Easter Egg coloring! 

While this way worked, and I have a nice display of long lasting colored Easter Eggs, it was a pain in the you know where to do. I ended up pricking my holes a bit bigger, and thus you can see them very well, to make it easier to blow the egg yolk out.

Also, when I was dying the eggs, they were so light from having nothing in them that I had to hold the egg down in the liquid with my fingers.  Which is hard to do, when you are doing this a with a toddler in her learning tower and she wants to simultaneously break all the eggs and splash colored water all over the kitchen!

I mixed the yellow and blue to make green and the red and blue to make purple to give me a total of 5 different colors.  Here is a good link with the recipe for the coloring. You basically just need vinegar and water.

And since I used farm fresh eggs, as you can see, they are not all white.  The brown eggs did get some color but not nearly as much as the white eggs.  But I actually like how they turned out.  They look exactly like what they are; Natural Easter Eggs!

Then we took the leftover colored water outside for some finger painting fun.  And Penelope decided that dying her brand new Pottery Barn cloth baby doll would be much more fun.  Either that or she decided that it was not cool to have all white baby dolls and that her baby doll collection needed some diversity.  :)


Wednesday, April 13, 2011

Butterfly Pose for Tots


Butterfly pose is such a fun and easy pose for your toddler. You can start teaching this pose as soon as they have mastered sitting up. In fact, most babies, as they are learning to balance while sitting up, will naturally put their feet together in front of their bodies,  to create a more stable foundation for themselves.

First you need to do the pose yourself and show little one what it looks like.

As a totally unrelated side note, I am having a really hard time finding the right word to describe our babies/tots/toddlers/little ones/kids. It's starting to drive me insane. Penelope is not a kid but she is not a baby, clearly she is a toddler, but the poses I talk about here are not just for toddlers they are for babies too and even older kids for that matter. Ahhhhh!! So if anyone has a good word that encompasses all those things PLEASE let me know.

Ok, back to Butterfly pose.

So once you have done the pose your self you can help your little one (see what I mean!!!) by putting their feet together for them. Then show them how to move their knees up and down by gently, doing it for them.


Then move your own knees up and down and show them again. And say Butterfly!!! You do it!!!!

I like to say Butterfly slowly and rhythmically, almost like I am chanting and I move my legs in the same rhythm that I am speaking.

Then I like to say, now open up your feet like a book! I do the sign for book, and then I open up my feet. So the outside of the feet stay together and inside of the feet open up.  Then again, I say your turn!!!

Then I usually do the sign for Butterfly and go back to "flapping my wings".

In an older kid class, I may take my first two fingers and use them as my "antennae" and play around with them really getting into pretending we are butterfly's.

Butterfly pose is a great pose for Mama's too, it is one of the best poses for releasing tension in your hips, groin and inner thighs.  Which is oh so important if you are trying to conceive or are pregnant.

And as always give them lots of praise when they do the pose.  Try not to say good job, but other things like yay! you did it!  what a beautiful butterfly!  how does it make your legs feel?!

Just FYI, most of the baby yoga poses I post, I learned at my Itsy Bitsy Yoga training. The founder and creator, Helen Garabedian, has a great book and dvds that you can purchase to help your home practice. Or you can go to her website and try and find a class near you!


Friday, April 8, 2011

This Moment: Belly Flab


Oh, man, this is kind of painful.  Hopefully it will hold me accountable and help inspire me to eat less sugar.

Basically, this is what eating cookies every day looks like.  I eat very healthy and make sure to meet my nutritional needs, but I have a serious sweet tooth. 

I have no words for this one.


Well, at least my arm looks ripped in this one.

Thursday, April 7, 2011

How to Really Store Breast Milk


I know everyone is pretty familiar with the breast milk storage guidelines.  They have been the standard guidelines for a long time and anyone who's anyone in the breastfeeding world stand by them.  Here is Kelly Mom's standard page and here is the La Leche League's.

I have found them to be conservative in some areas and would like to share my take on breast milk storage. 

What got me thinking along these lines of breast milk storage was that I had heard through the online grapevine that the standards were conservative and that a good rule of thumb is to let the baby taste the milk before throwing it out just because it has passed the aloted time.

I also started thinking about how raw milk, sours, it doesn't go bad.  And sour raw milk is really good for you.  So why would slightly soured breast milk be any different?

So I started experimenting with the times to see how far I could push it.  As you all know, I have been exclusively pumping for Penelope since she was a week old.  She comfort nurses around the clock, but I still pump for her once a day and give her a bottle once a day. 

When she was younger, and I was pumping every two hours, I would just give her what I just pumped.  But as she got older and my supply stayed at feeding-a-small-African-village level, I spaced out my pump sessions and got larger amounts at each session.  So that meant, in order to give her fresh milk, I just left it out on the counter till it was time to feed her next.

I tried to always give fresh-from-the-tap-milk, that had never seen the inside of the refrigerator.  I wanted her milk to be as close to perfection as possible.  Because even milk that has been the refrigerator looses some of it's leukocytes and beneficial bacteria.

So here is what LLL's says:
  • at room temperature (66-78°F, 19-26°C) for 4 hours (ideal), up to 6 hours (acceptable) (Some sources use 8 hours)
  • in a refrigerator (<39°F, <4°C) for 72 hours (ideal); up to 8 days (acceptable)
  • in a freezer (-0.4 to -4°F, -18 to -20°C) for 6 months (ideal) up to 12 months (acceptable)
What I have found to be true:

I have found that at room temperature, that you can really leave breast milk out for 6 to 10 hours (ideal), up to 12 to 14 hours (acceptable).  

I also found that the exact temperature of "room temperature" doesn't really matter.  I have taken bottles in the car, outside, even in the summer.  

And as far as thawed frozen milk goes, the guidelines say to store it in the fridge no longer than 24 hours.  I have found that its really more like 72 hours.

I also never threw out a bottle that she didn't finish. I pace fed her, on demand, because I was trying to make her intake of milk as close as possible to normal on-demand nursing.  So she was a "classic" breastfeed baby in the sense that she never ate more 2 ounces at a time, through the day and night.  I just put the bottle back on the counter until the next time she was hungry, never putting it in the fridge.

As a side note, when you store breast milk in bags, you can lay them flat like bricks (as in the picture above) and they take up less space in your freezer that way.

P.S.  This is not medical advice, you must follow your own intuition about what is right for you and your baby. This is simply my experience.

Monday, April 4, 2011

Freezer Cooking with Slow Cooker Recipes

Welcome, Pinners!  Please be sure to check out my Real Food tab at the top to find more slow cooker freezer meals!


Like I mentioned in my post the other week, the last time I did a big cooking day, I had big ah-ha moment.


Although, I had a blast with Lauren, it was logistically very difficult to accomplish, between the juggling of cooking and childcare, the prep work, organization and scheduling, it can be overwhelming.


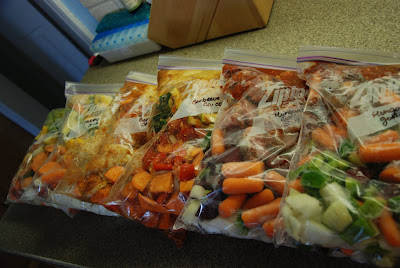
So this latest big cooking day, I did it by myself and only did slow cooker recipes.  Basically, all I was did was chop vegetables and assemble ingredients.


Even with doing it this way, it was still a 3 hour affair, but during this time I was able to finish all the cooking AND the cleaning.  Most importantly my feet didn't ache at the end like they normally do.  I also didn't have any sort of panic or anxiety leading up to the big cooking day like I normally do. HUGE.

I chopped all the vegetables with Penelope in her Learning Tower before nap (which was really fun, I went through all the colors of the vegetables with her and talked about rainbows and made it a fun learning experience).


Then I assembled everything during her nap (thank you Jesus, I can now skip a pump session here and there and can do other things at nap time than sit in front of a computer) and finished cleaning up after nap, again with her in her Learning Tower.  


This time she played independently with a bowl of soapy water, she made a huge mess,  but the rags I used to clean up her mess where the same rags I used to clean up my mess so it wasn't that bad.


I just dumped the veggies into the gallon ziploc bags, then added the meat, then added the spices.


Once I was done and cleaned everything up, I felt like I had invented electricity!  I thought I was such a genius for finally (it took me over a year, people) getting once a month cooking down to an efficient and easy art form.


I am telling you it will change your life! Give it a try and tell me how it went!


Here are my recipes.  I use a ton of vegetables in each meal, because I don't tend to eat a lot of veggies through out the day, so I try and get them all in at dinner.  And Peter is more apt to eat veggies if they taste like barbecue or curry than as a plain side dish.


Healthy Mama Barbecue Chicken
3 medium unpeeled  sweet potatoes, cut into 1/2 inch pieces
2 large green pepper, cut into strips
1 large red pepper, cut into strips
1 zucchini, chopped
1 medium onion, sliced
1 tablespoon quick cooking tapioca
2 pounds chicken thighs or drumsticks
1 8-ounce can of tomato sauce
2 tablespoons packed brown sugar
1 tablespoons Worcestershire sauce
1 tablespoon yellow mustard (I wasn't sure if this meant actual mustard or the spice so I did a little of both)
1 clove garlic, minced
1/4 teaspoon salt


Dump everything into two gallon freezer bags, shake it up, seal, label and put in the freezer.


Stephanie's Goulash
3 cups chopped onions
2.5 cups coarsely chopped green sweet peppers
4 large beets, peeled and diced
2 cups of carrots
3 cloves garlic, minced
3 pounds beef stew meat, cut into one inch cubes
1 6-ounce can tomato paste
4 teaspoons Hungarian paprika or regular paprika (I used regular)
1/4 teaspoon ground black pepper
4 cups hot cooked noodles
1/2 dairy sour cream


Dump everything into two gallon freezer bags, shake it up, seal, label and put in the freezer. EXCEPT the sour cream, that is for garnish after the meal is cooked.


Chicken Curry
3 tablespoons all-purpose flour
4 tablespoons curry powder
1.5 teaspoons ground cumin
1.5 pounds chicken thighs, cut into 1 inch pieces
2 cups chopped peeled sweet potatoes
2.5 cups baby carrots
2 cup coarsely chopped mango
1 cup chopped onion
1 zucchini chopped
2 cloves garlic, minced
1 chicken bouillon
.5 cup raisins (for garnish)
.5 cup peanuts or cashews (for garnish)


Dump everything into two gallon freezer bags, shake it up, seal, label and put in the freezer.


To cook, take out of freezer and set on counter for about 30 minutes, then dump contents of bag into slow cooker. Cook on high for 4 hours, or low for 8 hours.


Follow Me on Pinterest Or on Facebook!