Showing posts with label sewing. Show all posts

Tuesday, December 6, 2011

$2 Dishtowel Christmas Pillowcase Dress

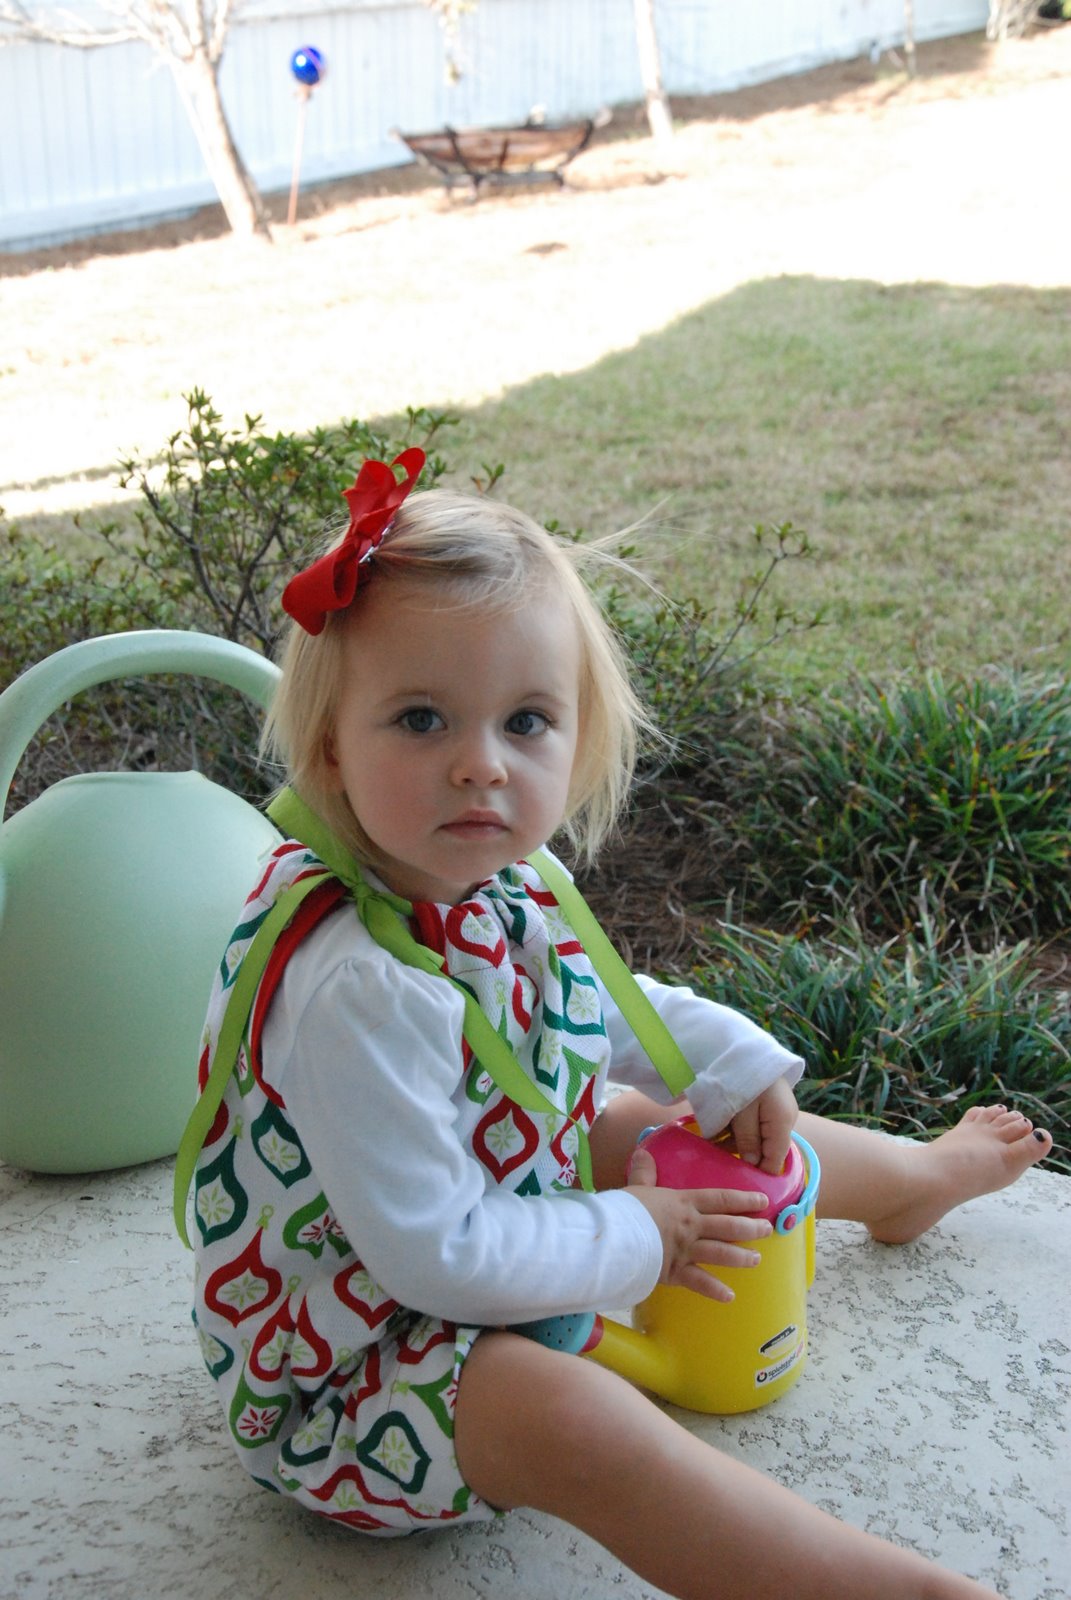
Yup,  I made my daughter I dress out of dishtowels.  

It is one of those things that could go very wrong or very right.  I wasn't convinced it was right, until she tried it on and then I felt pretty damn good.  But Penelope would look cute in a potato sack, so I am not sure if I am seeing clearly. 


I have seen dishtowel skirt tutorials online and that is what planted the seed for the idea in the first place.  Apparently, people are making other types of children's clothing with dishtowels.  I am not sure about this, but mad props to this mom for being creative.


In my mind a dishtowel is thicker and a tea towel is thinner.  This dress would probably be easier to sew with a thinner tea towel, but I liked that the dish towel was thicker, because it would give her added warmth this month.  Not that we need it, the high was 80 yesterday!

Miss P was not really in the mood to be photographed this day.  She just wanted to play, can't really blame her.

I originally planned to make her a Christmas dress with some amazing, vintage inspired Christmas fabric I found, but after I paid for it, I got an email saying they were sold out.


I needed to come up with plan B and I did not want to go into Joanne's and wait in line for an hour, so I decided to tempt fate and experiment with the dish towels!

I got the towels at Target, the day after Christmas last year, and got them 50% off.  They came in a bundle of two, and with the sale cost $2.  I used one for the front and one for the back.  I had the ribbon and bias tape on hand from another project.


I think the pattern design of the towel is what is going to make or break a sewing project with a dish towel.  It has really got to be super cute. I love this modern Christmas design, I think it makes the dress pop.


You sew the towels together, along the long sides, right sides facing.  This gives you a tube of dish towel.  Then you cut out your arm holes, sew the bias tape on, and make a regular pillow case dress like here and here.


I also made this little cutie, inspired from where else, Pinterest.  I wanted to make a shirt that could be worn with her red and green skirt that Penelope wore for her birthday.  You did see the Apple Party pictures, right?!


So what do you think?  Is the dish towel, pillow case dress, a right or a wrong? 


Follow Me on PinterestOr on Facebook!
Posted by Picasa

Tuesday, November 8, 2011

DIY Baby Infiniti Scarf

I was so excited when the cooler weather arrived because Penelope and I love to wear scarves.  Last year she wore a scarf of some kind, pretty much every day.  


As I started pulling out her scarves, I noticed a couple of things.  The original one I made, was a regular, long rectangular scarf.  It was from an old American Apparel scarf of mine, that I cut in half and gave to her.  But this regular scarf did not stay on well, while out playing, only her No Sew Baby Cowls did. 


But when I looked at those, I realized that with just a little bit more effort I could make a better one.  I still love these cowls, and if you don't have a sewing machine or much time, MAKE THOSE,  it is far more important for your kid to being wear a scarf than to be wearing a perfect one.  They are ridiculously easy-just cut off the bottom of an old t-shirt/dress and bam, you have a scarf.


But if you have a sewing machine, some basic skills and a few minutes, try it this way for an updated, and little bit more refined look.  


And making this version of an infinity scarves, with fabric rather than a t-shirt, gives you much more options with colors.


I also didn't like how all her No Sew Baby Cowls were different widths and lengths, some looked better on her than others because of that.  So I picked the one that fit her body best and measured it to create the new version.


The first thing I did was sew the ends together, of that very first scarf she ever wore, and turned it into an infinity scarf.  Less than 30 seconds, and DONE!  Just sew the ends together and cut off any excess fabric with pinking shears.  Then place your stitching in the back when you put on the scarf.


To make this type of scarf with fabric, cut one piece 40x10.  Then sew the short ends together to make a loop.  Pick a type of fabric that does not fray like a jersey or a flannel.  And you are done!


I also wanted to make a fuller, warmer version as well. 


I cut two rectangular pieces of red chenille, 40x10.


Then sewed them together, right sides facing, along the long side. 


Then I turned it inside out, and that gave me a long tube.  Then I sewed the ends together, to make the scarf.  


There a couple of ways to do this, I choose to do a French seam to give the scarf a finished look, but I am still a pretty basic sewer, and I am sure there is a million other ways to do it.  Here is another great Infinity Scarf (for a Mama) tutorial.


And that is it.  The whole project will take about 15 minutes, from cutting to sewing.  


Now, go make your little one a scarf and keep the flu and colds away this winter season!!


Follow Me on Pinterest Or on Facebook!

Tuesday, October 18, 2011

Easy DIY Baby Gift

One of the blessings of being a woman of childbearing age myself, is that I know lots of other women of childbearing age, that are busy bearing children.  And that means I want to give lots of gifts and go to lots of showers.  


I mentioned on the MBL Facebook page, that I love kids birthday parties because they are a celebration that the child is here and healthy and should they should be honored (not something to complain about like this Mom), and like birthdays, I love celebrating my friends pregnancies too.


I wish I could go and drop serious cash on each and every preggo friend, but alas, I can not.  But I found the perfect handmade gift to give instead.


Warning, if you are reading this and you are pregnant friend of mine, you will be getting this gift.  :)


The combination of a coordinated burp cloth and crinkly toy is perfect.  The burp cloth takes like 2 minutes to make and the crinkly toy about 15 minutes, when its all said and done.  They both use just a tiny bit of fabric, so it is a great way to use up some your scrap fabric.  


And it is cheap.  It probably costs me less than  5 bucks on supplies for this gift, but if I were to buy this at boutique it would be MUCH more!


To make the burp cloth, you cut out a rectangle the length of the burp cloth and top stitch all around.  Seriously, less than 2 minutes.

Here is my tutorial for the crinkly toy.  This toy was one of Penelope's first favorite toys.  She could clutch and play with this way before she had the ability to clutch all her wooden Haba toys.  


This was the only thing that would keep her happy on car rides when she was a baby.   It was a God send.  Not only is this toy adorable and easy to make, it is something your preggo friends will be grateful to have received it.


What is your go to baby shower or new baby gift?


Posted by Picasa

Tuesday, October 4, 2011

Bean Bag Chair Cover Tutorial

I searched and searched online and could not really find a great bean bag tutorial.  The best I could find was this, and it helped me understand the concept of making a spherical shape, but I still didn't really like it.

So as usual, I just winged it and did whatever the hell I wanted to do, in the moment.    And it all turned out good enough for me!


As long as you don't look at the seams too close, they are super cute.  I figured they are going to get lots of wear and tear, so it didn't really matter if they are perfect.


Penelope loves them and that is the most important thing.  She loves to go in there and play with her little Calico Critter dolls.  I bought them on a whim, even though the box says 3 and up and has a million tiny pieces, and I am so glad I did.  These are probably her most played with toy right now.  She will sit for a long time and pretend all sorts of little scenarios, it is great.


They do require a lot of fabric, especially if you go the traditional bean bag/pouf route.  But I used sheets that I got a garage sale, and spent only a couple of dollars.  The one on the right is an old Ralph Lauren sheet and the one on the right is an old Pottery Barn duvet.

I bought this bean bag chair insert, from The Company Store.  In the video link above, they used cut up foam mattresses as filing.

Then I cut out my pieces.  If you go the traditional route, you need six pieces like this.  As long and wide as you need them.  I made a huge mistake and forgot to leave the bottom of the panel wider than the top.

Then cut your two circles in the diameter that you need. The wider at the bottom panel, is to be attached to the bigger circle, the smaller top, to the smaller circle.

This is the point I realized I had f-ed it up.  I did not make my panels wide enough, so it wouldn't fit.  So I had to switch to plan B.  I ended up opening up the bean bag, even though the tag, explicitly says DO NOT OPEN.  Like I said, I tend to do whatever the hell I want and so I opened it up.


Inside was small pieces of popcorn packaging.  So basically, I made a huge mess. It vacuumed up super easy though.


After I made the first one. I thought, Good God, there has got to be an easier way.  Then a little later, I was sitting on my couch with Penelope, looking at my dog's bed.   His bed, is basically a big round pillow with a panel between the top and bottom to give it some height.  So then I thought, what if I just did a big round pillow with no panel??


It took two seconds to make one this way!  It looks almost the same and took about 80% less time!

The one on the right, is with the panels, the one on the left is just a big round pillow.    All you do is cut two circles, any size you want (I used my round coffee table as a cutting template) and place them right sides facing. Then sew all around it, but leave a large opening to stuff it, then turn it inside out and stuff and sew closed.


I closed with a hand it stich and then went back over it with the machine to reinforce it.


Pretty cute right?  And a million times easier than a regular bean bag, right?  Have you ever made one?


Posted by Picasa

Wednesday, September 14, 2011

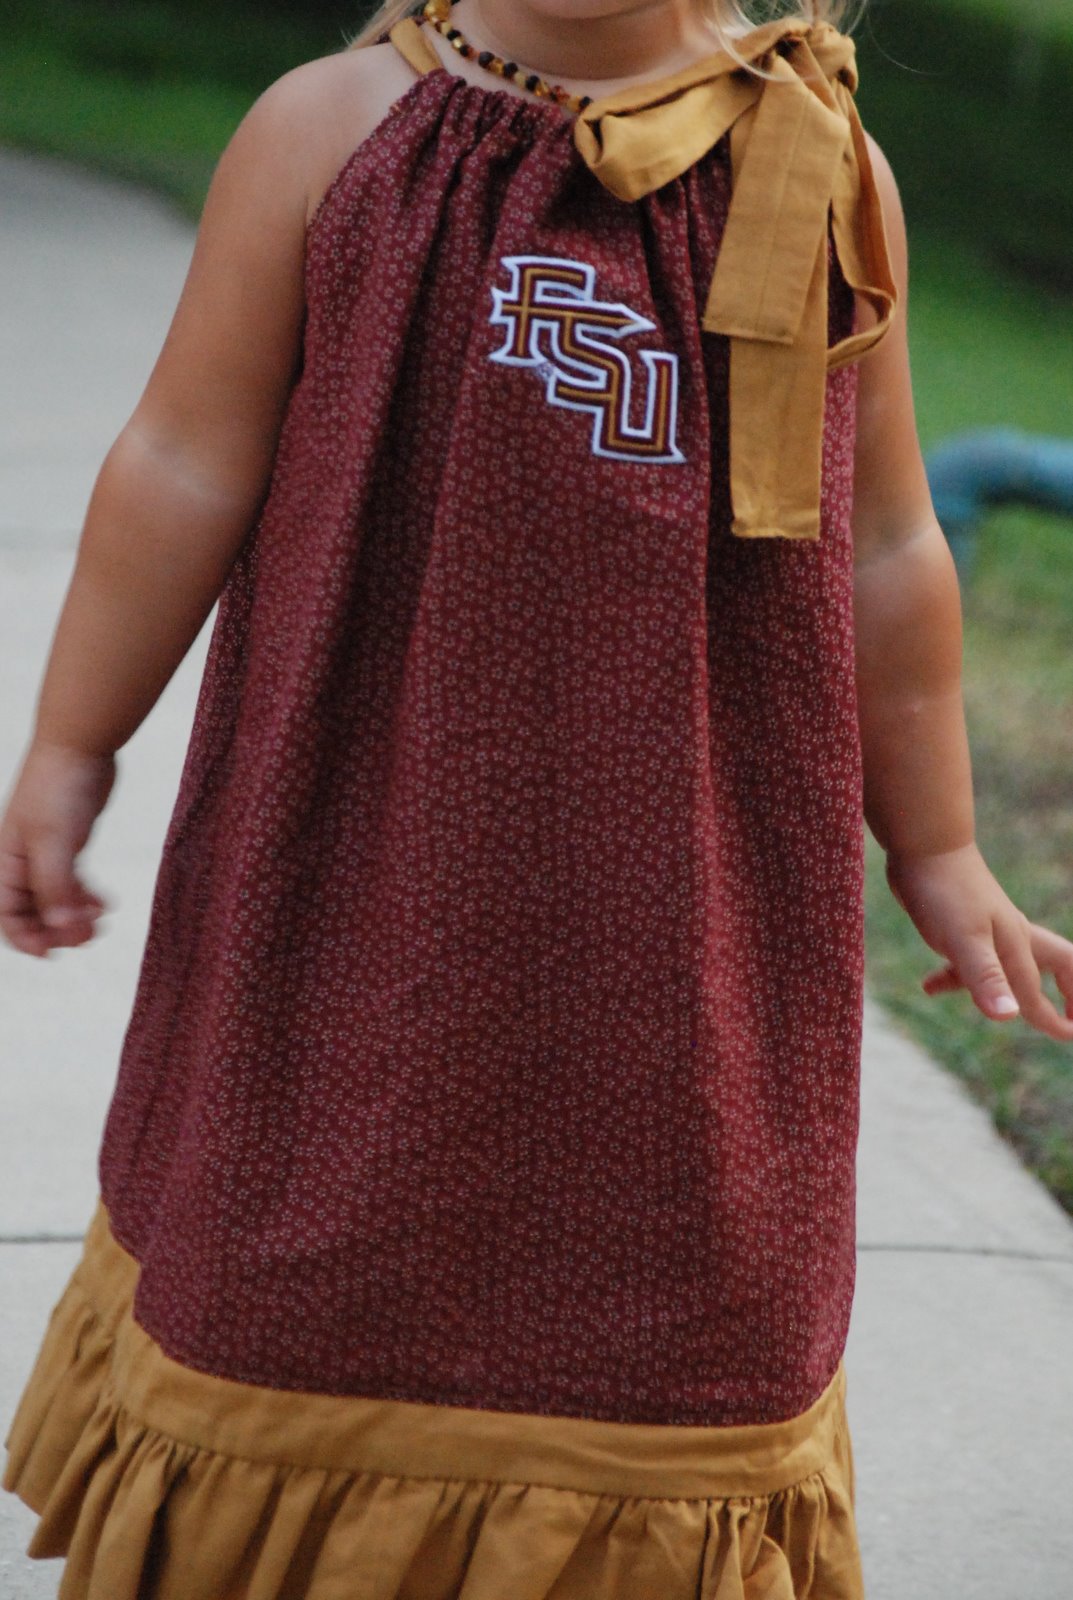
FSU Pillow Case Dress with Ruffle from HootyCutie Designs

HootyCutie Designs, who did the awesome Party Banner Tutorial for us last week, sent Penelope a pillow case dress recently.  When she asked if she could make Penelope a dress, at first I thought, she already has too many from what I have made her, but my curiosity of wanting to see how she sewed them compared to mine, won out.  I also needed to make her an FSU dress, and with the playroom makeover consuming my time and beginning projects for her birthday party, holiday gifts etc, I was beginning to feel overwhelmed.  She took that right off my plate and made a dress a million times better than I ever could!

Her Holiday Dresses, have caught my eye too.  I want to make Penelope both a Thanksgiving and Halloween dress, but I just don't know how I am gonna do it!

Penelope was not in the best picture taking mood, while we were out Down Town Getdown (big mistake, not doing that again till she is older, she freaked out with the crowds. Why, oh why, did we not learn our lesson at Disney, when Penelope did not like the crowds there either?!?).  You can see her full fall FSU/UF team spirit line here on her blog, or at her Etsy shop.  I am pretty sure she will do custom orders if you are BAMA fan or LSU fan.


I was most impressed with her attention to detail and the quality construction of the dress.  I also love the added details of the ruffles and the handmade bias tape/ribbon (instead of gross grain or store bought bias tape like I use). I also asked her to do a one sided tie, to make it different from what I normally make Penelope.

So please support this super talented Mama, check out her Etsy shop and shoot her a convo about doing something custom, if you have the vision, I am sure Niki can whip it up!


Posted by Picasa

Wednesday, September 7, 2011

Party Banner Tutorial

Niki, of HootyCutie Designs was kind enough to do a guest tutorial for all you lovelys.  She is an amazingly, talented seamstress and has just started up her own Etsy business.  Please give her a warm welcome and check out this very detailed and through tutorial!  She puts my sewing tutorials to shame!  Take it away, Niki!

It is quickly approaching my favorite time of year. Fall! Football season, shortly followed by holiday time… it’s the most wonderful time of the year (I know terrible!).  It is my favorite time of year, because there is are so many celebrations and so much time spent with friends and family. And celebrations mean decorations… and so, I introduce the Party Banner Tutorial.
For this project you will need three fabrics (1/4 yard each):
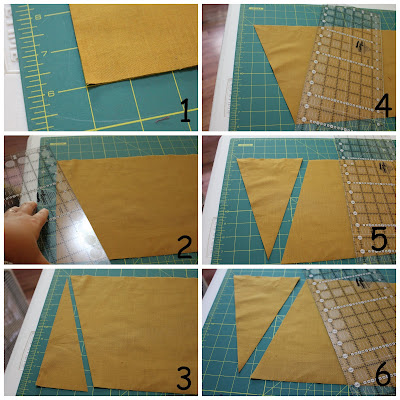
The first step is to cut your triangles for your pendants. For this banner I made them six inches wide, but I’ve also made others eight inches triangles and it works just fine for a larger design. You simply want an even number to make your triangle. First (pic 1) –  lay your fabric (folded in half) out on a cutting board with one corner lined up square with the markings on the board. Second (pic 2) –because you want the top to be 6 inches wide, you are going to angle your cutting board 3 inches from the edge of the top of the fabric to the bottom.( For instance, I started my fabric at the one mark, so I angled my board from 1 at the top corner to 4 at the bottom.) Next (pic 4) – angle 3 inches from the triangle point to the top going in the other direction (first triangle made). From there (pic 6) – angle three inches back the other way and so on until you reach the end of the fabric. This will give you six pendants (2 triangles each… so 12 triangles total).
Repeat this with your second fabric. In this case I am using a fabric with a directional pattern. So I know what you are going to say. Half of the pendants are upside down. Don’t worry, I’ve got you covered. Simply use the upside down triangles as the back sides of your pendants.
Now you are going to cut the third fabric for the ties. Lining up the fabric lengthwise, cut two strips 2 inches wide.
With the remaining fabric you are going to create your letters. Now, if I had one of those fancy cutting machines, I would so have used that! Alas, I do not. This just goes to show you that anyone can make this banner! And trust me, I have terrible handwriting too.  Whether you are lucky enough to be using a cutting machine, or doing them by hand, you are going to want your letters to measure 3.5 inches tall by 2 inches wide. (Please ignore my sad excuse for an “S”). I used scissors to cut out the letters and an X-acto knife to cut out the middle of the “O”.
Since N-O-L-E-S is only five letters, and I had six pendants to fill, I came up with a solution. I simply cut out an “FS” from the extra patterned fabric I had from cutting out the other pendants and attached it as I would the letters.

Now to add your letters to your pendants. You have several options here. I was going for a more “raw” look, so I chose to simply sew my letters on as is. However, this CAN be time consuming and slightly tricky. So if you want something simpler, you can use iron on fusible (I like Steam-a-Seam Lite) to add the letters. If you choose to use the fusible, I would add the fusible to the letter fabric BEFORE you cut out the letters. If you are going to sew your letters on, remember to sew your letter to only a single layer of the pendant (Why do I mention this? Yeah… I’ve done it).
Now that your letters are attached, you are ready to assemble all your pendants. For your letter pendants, you will pin one triangle with a letter, and one without making sure you put your pendants right face together.  Remember when you make your pendants with the directional fabric that you pair a “upside down” triangle with a corresponding “right side up” triangle. Using a ¼ inch seam (I actually do less), start at the top and sew down one side and then up the other leaving the top open.
Then you are going to turn the pendants right side out. I use my old dog chewed paint brush to push the tip out.  
Then you are going to press the pendants. I’ve found the easiest way to do this is to start at the tip, working up one side, then flipping it over to do the other side. If you roll the seam between your fingers, it will push it out all the way.
Next you will need to make the “bias tape” to attach all the pendants together. It is not a true bias tape because we did not cut our fabric on the bias, but this is the method used to make bias tape. You could just buy bias tape, but it would up your cost significantly. The first thing you will do is attach your two strips together with a diagonal seam. I think the pictures do a good job showing how to do this. If you are using printed/one-sided fabric, make sure that you pin them right sides together.
Then, take a long needle and stick it in your ironing board top creating a one inch gap.
Then take your long strip (remember the two strips are now one long strip), fold it in half, and cut an angle on BOTH ends.  Feed that angle underneath your one inch gap created by the needle. This will fold your two sides in ¼ of an inch. Feed it all the way through to the other end.
Fold and press this strip in half. To finish the ends you will fold over the point of the angle you cut in the beginning. Press it in place, and then fold the strip in half for a clean finish.
 
The next step is not necessary, but makes hanging the banner much easier. I used the left over fabric from making the letters to cut to small ties to add to the ends of the bias tape. I cut them 2 inches wide and 8 inches long. Follow the same method above, finishing off ONLY ONE end of each strip by tucking the angle.
Run a stich from the finished end of the smaller strips down to the unfinished angled end. I do my stich as close to the open edge as possible.
We are almost there people! Now you need to attach your pendant pieces to your “bias tape” Figure out which pendants are going to be the middle of your banner. I sketched mine out on paper.  How do you find the center of the “bias tape”? Since you have sewn two equal length strips together, you can use the middle of that seam as center. Starting on one side of the middle, place one of the pendants in the fold of the “bias tape” and pin it in place. I like to leave a small gap between my pendants, but it is not necessary. Once you finish one side, go back and do the other side.
If you are adding the small ties, make sure you pin them into the banner at the ends. Use the angle on the unfinished end to make it stick out.
Last step! Stich your bias tape closed. I pinned the banner towards the left; because that is the way I am going to run it through the machine. This way I can pull pins them out as I go (without ruthlessly stabbing myself).
Voila! You have a very professional looking party banner!
Hope you have a great time creating your banner!
Don’t sew? Don’t have time to make it yourself? Just head on over to HootyCutie Designs! I can create a custom banner to match any of your party needs.